
카프카 빠르게 시작해보기
카프카 빠르게 시작해보기
2.2 카프카 커맨드 라인 툴
2.2.1 kafka-topics.sh
토픽을 생성하는 2가지 방법
카프카 컨슈머 또는 프로듀서가 카프카 브로커에 생성되지 않은 토픽에 대해 데이터를 요청할 때
커맨드 라인 툴로 명시적으로 토픽을 생성하는 것
토픽 생성
$ bin/kafka-topics.sh \
    --create \
    --bootstrap-server localhost:9092 \
    --topic hello.kafka \
파티션 개수, 복제 개수, 토픽 데이터 유지 기간 옵션들을 지정하여 토픽을 생성하고 싶다면 다음과 같이 하면 된다.
$ bin/kafka-topics.sh \
    --create \
    --bootstrap-server localhost:9092 \
    --partitions 3 \
    --replication-factor 1 \
    --config retention.ms=172800000 \
    --topic hello.kafka.2 \
토픽 리스트 조회
$ bin/kafka-topics.sh --bootstrap-server localhost:9092 --list토픽 상세 조회
$ bin/kafka-topics.sh --bootstrap-server localhost:9092 --describe --topic hello.kafka.2토픽 옵션 수정
파티션 개수를 3개에서 4개로 늘리고, 리텐션 기간은 172800000ms에서 86400000ms(1일)로 변경해 보자.
$ bin/kafka-topics.sh --bootstrap-server localhost:9092 \
--topic hello.kafka \
--alter \
--partitions 4
$ bin/kafka-configs.sh --bootstrap-server localhost:9092 \
--entity-type topics \
--entity-name hello.kafka \
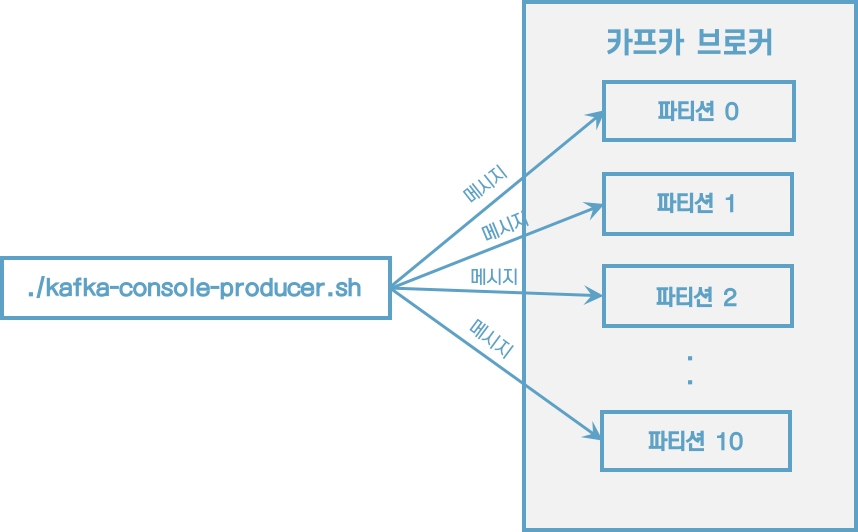
--alter --add-config retention.ms=864000002.2.2 kafka-console-producer.sh
$ bin/kafka-console-producer.sh --bootstrap-server localhost:9092 \
    --topic hello.kafka
메시지 키 없이 메시지 값만 보내도록 하자. 메시지 키는 자바의 null로 기본 설정되어 브로커로 전송된다.
이제 메시지 키를 가지는 레코드를 전송해보자.
$ bin/kafka-console-producer.sh --bootstrap-server localhost:9092 \
    --topic hello.kafka \
    --property "parse.key=true" \
    --property "key.separator=:"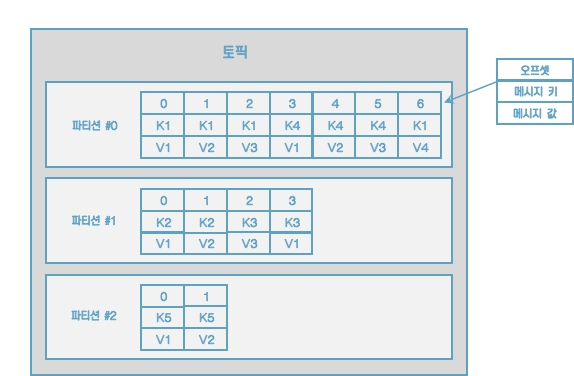
메시지 키와 메시지 값을 함께 전송한 레코드는 토픽의 파티션에 저장된다. 메시지 키가 null인 경우에는 프로듀서가 피티션으로 전송할 때 레코드 배치 단위로 라운드로빈으로 전송한다. 메시지 키가 존재하는 경우에는 키의 해시값을 작성하여 존재하는 파티션 중 한 개에 할당된다. 이로 인해 메시지 키가 동일한 경우에는 동일한 파티션으로 전송된다.
파티션 개수가 늘어나면 새로 프로듀싱되는 레코드들은 어느 파티션으로 갈까?
이전에 메시지 키가 파티션 0번에 들어갔다면 파티션을 늘린 뒤에는 파티션 0번으로 간다는 보장이 없다. 만일 파티션을 추가하더라도 이전에 사용하던 메시지 키의 일관성을 보장하고 싶다면 커스텀 파티셔너를 만들어서 운영해야 한다.
2.2.3 kafka-console-consumer.sh
$ bin/kafka-console-consumer.sh --bootstrap-server localhost:9092 \
    --topic hello.kafka \
    --from-beginning
데이터의 메시지 키와 메시지 값을 확인하고 싶다면 --property 옵션을 사용하면 된다.
$ bin/kafka-console-consumer.sh --bootstrap-server localhost:9092 \
    --topic hello.kafka \
    --property print.key=true \
    --property key.separator="-" \
    --group hello-group \
    --from-beginning

key1-no1
null-4
null-5
null-0
null-1
null-2
null-3
null-hello
null-kafka
key2-no2
key3-no3
메시지 키를 확인하기 위해 print.key를 true로 설정했다.
메시지 키 값을 구분하기 위해 key.separator를 설정했다.
--group 옵션을 통해 컨슈머 그룹을 생성했다. 이 컨슈머 그룹을 통해 가져간 토픽의 메시지는 가져간 메시지에 대해 커밋을 한다. 커밋 정보는 __consumer_offsets 이름의 내부 토픽에 저장된다.
전송했던 데이터의 순서가 현재 출력되는 순서와 다르다는 것이다. 이는 카프카의 핵심인 파티션 개념때문에 생기는 현상이다. kafka-console-consumer.sh 명령어를 통해 토픽의 데이터를 가져가게 되면 토픽의 모든 파티션으로부터 동일한 중요도로 데이터를 가져간다.
2.2.4 Kafka-consumer-groups.sh
컨슈머 그룹의 리스트를 확인
$ bin/kafka-consumer-groups.sh --bootstrap-server localhost:9092 --list$ bin/kafka-consumer-groups.sh --bootstrap-server localhost:9092 \
--group hello-group \
--describe2.2.5 kafka-verifiable-producer.sh, consumer.sh
$ bin/kafka-verifiable-producer.sh --bootstrap-server localhost:9092 \
    --max-messages 10 \
    --topic verify-test
전송한 데이터는 Kafka-verifiable-consumer.sh로 확인할 수 있다.
$ bin/kafka-verifiable-consumer.sh --bootstrap-server localhost:9092 \
    --topic verify-test \
    --group-id test-group
2.2.6 kafka-delete-records.sh
이미 적재된 토픽의 데이터를 지우는 방법
vi delete-topic.json
{"partitions":  [{"topic": "hello.kafka", "partition": 0, "offset": 50}], "version": 1}

$ bin/kafka-delete-records.sh --bootstrap-server localhost:9092 \
    --offset-json-file delete-topic.json
토픽의 특정 레코드 하나만 삭제되는 것이 아니라 파티션에 존재하는 가장 오래된 오프셋부터 지정한 오프셋까지 삭제된다는 점이다.
Last updated